webpack,多的是你(实际是我)不知道的事~ 距离成为一个webpack配置工程师还要继续努力丫~
实现一个mini-webpack
step1 模块分析 moduleAnalyser
node模块fs读出内容– AST(利用AST节点找到依赖模块)–compile(生成浏览器可执行js)
- 用node的fs模块获得文件内容,
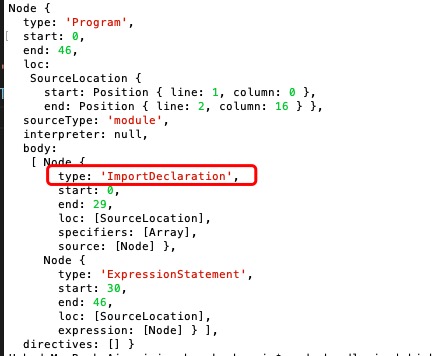
- 使用babel/parser将内容转换为ast,使用babel/traverse找到importDeclaration节点,将文件依赖信息存储到depencies
- 使用babel/core babel/preset-env 将ast编译成为浏览器可以执行的code
- 返回{filepath, dependencies, code},即输入模块的绝对路径, 模块依赖(文件路径),编译后代码。
下图是部分ast截取内容,该节点是一个引入声明,即我们需要找的依赖模块
step2 生成依赖图谱 makeDependenciesGraph
- grpahArray数组先存放入口文件分析结果
- 遍历grpahArray, 只要有迭代对象的dependencies有值,调用moduleAnalyser将当前模块的依赖分析结果push入数组。
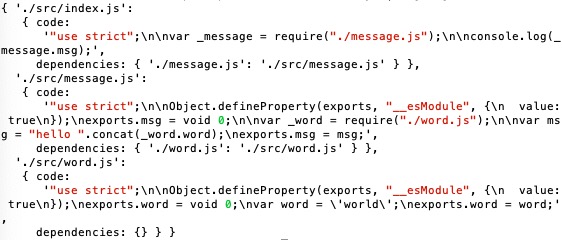
- 数组格式化为对象,key是文件绝对路径,value是{dependencies:xx,code:xxx}
下图是样例依赖图谱内容
step3 生成代码 generateCode
本质:返回一个闭包函数,参数是依赖图谱。核心的require函数,接受一个模块,会执行该模块的编译后代码。首先require了入口文件。入口文件模块的编译后的代码被执行,编译后的代码中如require其他模块,则会加载该依赖模块的编译代码。所以会递归调用require函数。
- 构建闭包函数,参数是依赖图谱
- 闭包函数中定义一个require方法,require(‘index.js’)
- 在require中构造一个exports对象,记得return出去
1 | const fs= require('fs') |
实现一个webpack loader
loader用于对某一类型的文件进行转换,loader是一个函数,参数是source(原文件内容),函数返回转换后的内容。
官方推荐使用loader-utils。
demo: 实现一个将js文件中的apple字符串替换成moka-moka的loader。1
2
3
4
5
6
7
8
9
10
11
12// loaders/replaceLoader.js
const loaderUtils = require('loader-utils')
module.exports = function (source){
console.log('source',source)
const options = loaderUtils.getOptions(this)
return source.replace('apple',options.name) // same as : this.query.name
// this.callback(null, source.replace('xiesi',options.name))same as return in this case
// return only return transformed content, but callback return more includes err & sourcemap & meta
// this.callback(err, content, sourceMap, meta)
}
1 | // webpack.config.js |
实现一个webpack plugin
plugin用于在webpack打包的某特特定hooks时期内执行某个功能,plugin是一个类,使用的时候必须用new调用。设计原理是发布订阅。这个类的原型上有个apply方法,插件被实例化的时候apply方法被调用,apply方法的参数是一个webpack实例,因此能触发webpack某个声明周期hooks钩子函数。
各种生命周期hooks详细见官网,点这里,如emit是一个异步的钩子,对应的时期是即将把打包后文件放入dist目录。
emit(官方文档)
- AsyncSeriesHook
- Executed right before emitting assets to output dir.
- Callback Parameters: compilation
demo: 实现打包完成后生成一个版权的txt文件到dist目录1
2
3
4
5
6
7
8
9
10
11
12
13
14
15
16
17
18
19
20
21
22// plugins/copyrightWebpackPlugin.js
class CopyrightWebpackPlugin{
apply(compiler){
compiler.hooks.emit.tapAsync('CopyrightWebpackPlugin',
(compilation, callback) => {
// debugger;
compilation.assets['copyright.txt']={
source: function(){
return 'copyright by si'
},
size: function(){
return 15
}
}
// 异步钩子才要调用callback
callback();
})
}
}
module.exports = CopyrightWebpackPlugin
1 | // webpack.config.js |
babel配置
各种依赖包作用
- @babel-loader:只是webpack和babel通信的桥梁,并不会转es6-es5
- @babel-core:js转ast,ast再编译成一些新语法
- @babel/preset-env: es6转es5规则 。preset中已经包含了一组用来转换ES6+的语法的插件,如果只使用少数新特性而非大多数新特性,可以不使用preset而只使用对应的转换插件。
- @babel/polyfill :babel默认只转换语法,而不转换新的API,下babel可以将箭头函数,class等语法转换为ES5兼容的形式,但是却不能转换Map,Set,Promise等新的全局对象,这时候就需要使用polyfill去模拟这些新特性。注意考虑按需引入问题。
1 | // webpack.config.js |
关于使用polyfill方式的几个demo的打包体积
- 加入所有@babel/polyfill (441k)
- 按需引入@babel/polyfill,使用useBuiltIns (72.5k)
- 指定浏览器 (指定浏览器)不一定用上pollyfill (6.64k)
- 不使用 @babel/polyfill 使用插件plugin-transform-runtime (6.67k)
npm install –save-dev @babel/plugin-transform-runtime
npm install –save @babel/runtime-corejs2
总结:
- 业务代码 用@babel/polyfill,注意考虑按需引入问题。
- 库代码 使用插件@babel/plugin-transform-runtime, 好处是避免preset/pollyfill全局引入污染全局的问题,插件是以闭包的形式引入内容。
- 更详细使用可以参考这篇文章
备注 一般我们会单独写. babelrc文件:表示webpack配置中babel-loader 的options选项。1
2
3
4
5
6
7
8
9
10
11
12
13
14
15
16
17
18
19
20
21
22
23
24
25
26
27
28
29
30
31// demo2 .babelrc
{
"presets": [["@babel/preset-env",{
"useBuiltIns": "usage",
}]]
}
// demo3 .babelrc
{
"presets": [["@babel/preset-env",{
"useBuiltIns": "usage",
"targets":{
"chrome":67
}
}]]
}
// demo4 .babelrc
{
"plugins": [
[
"@babel/plugin-transform-runtime",
{
"absoluteRuntime": false,
"corejs": false,
"helpers": true,
"regenerator": true,
"useESModules": false
}
],
"babel-plugin-dynamic-import-webpack"
],
}
基础配置
- entry:
写字符串ertry:’./src/index.js’ 等价写对象entry:{main:’./src/index.js’}
支持对象写入多个打包入口 - output:
filename: 入口html中引用的js文件名, 占位符包括[name][contenthash]
chunkfilename:入口html中引用的js的依赖的其他js的文件名
path: 打包路径 默认是dist文件夹, 即Path.resolve(__dirname, ‘dist’)=
publicPath:’http://www.cdn.test.com'(打包后在index.html注入的js路径带上cdn域名) - 常用插件:
HtmlWebpackPlugin: 在dist目录下生成一个html文件,并注入打包后的js
CleanWebpackPlugin:打包前清除上一次打包内容
miniCssExtractPlugin: 将css从js中提取出来 - devTools(配置sourceMap):存编译打包后代码与源码映射关系,方便定位代码问题。eval是打包速度最快的,cheap可以只定位到行信息不到列,module是也处理非主代码的loader的代码。开发推荐cheap-module-eval-source-map,线上用cheap-module-source-map
- 开发线上webpack不同配置
使用’webpack-merge’合并基础配置和某个环境的特殊配置。
common.config包括entry,output,某些plugin, moudles的loader配置
开发环境需要配置mode/devServer/HMR/sourceMap
线上环境需要配置sourceMap/压缩优化 - 多页面打包
本质:增加多个入口和增加多个htmlWebpackPlugin。配置插件的filename,chunks,template选项。
高级特性
treeshaking
- (只支持es模块引入,静态引入;默认生产环境的时候开启treeshaking)
- 开发环境配置package.json sideffect:[‘@babel/pollyfillt’,’*.css’] /false 和 webpack.config.js optimization:{usedExports: true}
code-spliting
code spliting 解决的问题?
- 拆分文件,利用缓存(第三方不怎么改的代码, 公用类库)
- 文件体积太大 影响加载
webpackh中实现代码分割两种方式
- 同步代码,再配置中写optimization即可
- 异步加载的也是代码分割(import)无需代码分割
webpack里面有很多插件智能方便实现code spliting(SplitChunkPlugin)
1 | optimization:{ |
splitChunks的默认配置是chunks:async,默认只对异步代码分割;同步代码只能在缓存上提高性能,对真正首屏性能提升有限,推荐尽可能多写异步代码。
prefetch & preload
区别?
什么是pre-fetch?
发现主要代码加载完,有网络带宽的时候去加载异步组件,不用等触发的时候再加载,详细见webpack官网。
什么是pre-load?
pre-load会与主代码一起并行加载。1
import(/* webpackPrefetch: true */ 'LoginModal');
lazying-loading
懒加载,即通过异步去加载代码,实现按需加载,具体实现如路由懒加载。webpack可以识别import语法,import必须使用polyfill.
css 代码分割
不做处理css会被打包进入js
miniCssExtractPlugin–单独打包css
optimizeCSSAssetsPlugins – 将打包后的css合并压缩
地址:https://webpack.js.org/plugins/mini-css-extract-plugin/